[ad_1]
On this tutorial, we’ll construct a easy login kind and add front-end validation with vanilla JavaScript. The overarching aim is to supply useful suggestions to the end-user and make sure the submitted information is what we would like!
information
This tutorial is written in order that rookies can comply with alongside—however some fundamental JavaScript data and understanding of coding rules will definitely assist!
Stay Demo of Our JavaScript Type Validation
Take a look at the pen beneath to check our JavaScript kind validation—fork it, be at liberty to repeat snippets of the code, and comply with the tutorial to see the way it was created!
Why Fashionable JavaScript Works Nicely Sufficient
Because of the latest developments in JavaScript, we will confidently use trendy JavaScript to perform kind validations with none dependencies.
Nonetheless, some frameworks out within the wild simplify the validation technique. We received’t be utilizing any dependencies for this tutorial to make all the pieces operate.
It’s additionally price mentioning in lots of conditions, HTML5 has built-in validations that may work effectively sufficient in your initiatives. These could be helpful when you aren’t considering creating your customized validations or lack the additional time. This tutorial will leverage the customized path to make the expertise extra branded.
1. Add the Markup
Beginning with the HTML, I created a easy account creation kind displayed within the middle of a web page. The shape options 4 enter fields (username, e mail, password, password affirmation) and a submit enter button.
Throughout the markup, we’ll add some further components to supply validation suggestions to the end-user. These embrace some SVG icons (sourced from heroicons.com and a few empty <span> tags. These are to supply actionable directions if a subject isn’t passing a validation.
<div class="container">
  <h2 class="title">Create a brand new account</h2>
  <kind motion="https://webdesign.tutsplus.com/tutorials/#" class="kind">
    <div class="input-group">
      <label for="username" class="label">Username</label>
      <enter id="username" placeholder="John Doe" kind="textual content" class="enter" />
      <span class="error-message"></span>
      <svg class="icon icon-success hidden" xmlns="https://www.w3.org/2000/svg" width="24" peak="24" viewBox="0 0 24 24"><title>check-circle</title><g fill="none"><path d="M9 12l2 2 4-4m6 2a9 9 0 1 1-18 0 9 9 0 0 1 18 0z" stroke-width="2" stroke-linecap="spherical" stroke-linejoin="spherical"></path></g></svg>

      <svg class="icon icon-error hidden" xmlns="http://www.w3.org/2000/svg" width="24" peak="24" viewBox="0 0 24 24"><title>exclamation-circle</title><g fill="none"><path d="M12 8v4m0 4h.01M21 12a9 9 0 1 1-18 0 9 9 0 0 1 18 0z" stroke-width="2" stroke-linecap="spherical" stroke-linejoin="spherical"></path></g></svg>
    </div>

    <div class="input-group">
      <label for="e mail" class="label">E mail</label>
      <enter id="e mail" kind="e mail" class="enter" autocomplete placeholder="john.doe@instance.com" />
      <span class="error-message"></span>
      <svg class="icon icon-success hidden" xmlns="http://www.w3.org/2000/svg" width="24" peak="24" viewBox="0 0 24 24"><title>check-circle</title><g fill="none"><path d="M9 12l2 2 4-4m6 2a9 9 0 1 1-18 0 9 9 0 0 1 18 0z" stroke-width="2" stroke-linecap="spherical" stroke-linejoin="spherical"></path></g></svg>

      <svg class="icon icon-error hidden" xmlns="http://www.w3.org/2000/svg" width="24" peak="24" viewBox="0 0 24 24"><title>exclamation-circle</title><g fill="none"><path d="M12 8v4m0 4h.01M21 12a9 9 0 1 1-18 0 9 9 0 0 1 18 0z" stroke-width="2" stroke-linecap="spherical" stroke-linejoin="spherical"></path></g></svg>
    </div>

    <div class="input-group">
      <label for="password" class="label">Password</label>
      <enter id="password" kind="password" class="enter" />
      <span class="error-message"></span>
      <svg class="icon icon-success hidden" xmlns="http://www.w3.org/2000/svg" width="24" peak="24" viewBox="0 0 24 24"><title>check-circle</title><g fill="none"><path d="M9 12l2 2 4-4m6 2a9 9 0 1 1-18 0 9 9 0 0 1 18 0z" stroke-width="2" stroke-linecap="spherical" stroke-linejoin="spherical"></path></g></svg>

      <svg class="icon icon-error hidden" xmlns="http://www.w3.org/2000/svg" width="24" peak="24" viewBox="0 0 24 24"><title>exclamation-circle</title><g fill="none"><path d="M12 8v4m0 4h.01M21 12a9 9 0 1 1-18 0 9 9 0 0 1 18 0z" stroke-width="2" stroke-linecap="spherical" stroke-linejoin="spherical"></path></g></svg>
    </div>

    <div class="input-group">
      <label for="password_confirmation" class="label"
        >Password Affirmation</label
      >
      <enter id="password_confirmation" kind="password" class="enter" />
      <span class="error-message"></span>
      <svg class="icon icon-success hidden" xmlns="http://www.w3.org/2000/svg" width="24" peak="24" viewBox="0 0 24 24"><title>check-circle</title><g fill="none"><path d="M9 12l2 2 4-4m6 2a9 9 0 1 1-18 0 9 9 0 0 1 18 0z" stroke-width="2" stroke-linecap="spherical" stroke-linejoin="spherical"></path></g></svg>

      <svg class="icon icon-error hidden" xmlns="http://www.w3.org/2000/svg" width="24" peak="24" viewBox="0 0 24 24"><title>exclamation-circle</title><g fill="none"><path d="M12 8v4m0 4h.01M21 12a9 9 0 1 1-18 0 9 9 0 0 1 18 0z" stroke-width="2" stroke-linecap="spherical" stroke-linejoin="spherical"></path></g></svg>
    </div>

    <enter kind="submit" class="button" worth="Create account" />
  </kind>
</div>
Issues to notice at this level:
- Every enter subject is grouped in a
divaspect with a category ofinput-group. We’ll use CSS so as to add some area between every subject. Inside every grouping, we’ve a set of SVG icons, a span subject, and an enter subject. We’ll use SVG icons to supply a visible cue whether or not the enter is legitimate or invalid. - We’ll use CSS to initially conceal every icon from view. Then we will leverage JavaScript to cover and present them relative to the person’s enter.
- I additionally plan to show a useful message throughout the
spantag with a category oferror-messageought to the shape’s validations be triggered to execute. There’s a singlespantag per enter grouping. - Lastly, discover that every enter has an id assigned. The id attribute is important for the tutorial’s JavaScript portion.
2. Styling the Type With CSS
To make the shape a lot simpler to make use of and extra accessible, we’ll add some CSS.
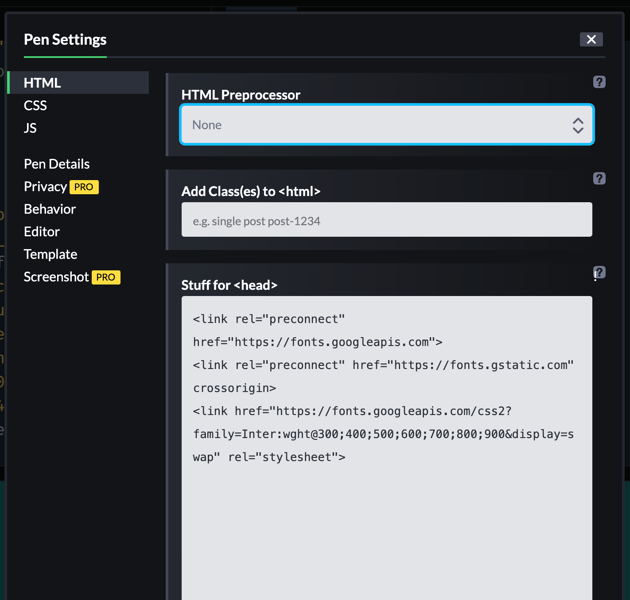
I linked to a Google Fonts Specimen referred to as Inter (which you’ll acknowledge from Tuts+). It’s a terrific sans-serif font face adaptable to many use instances.
If you happen to’re utilizing CodePen and following alongside, you will discover our font linked within the head tag choices contained in the HTML pane of the editor.


The CSS is comparatively simple. We’re utilizing CSS to cover all icons on the preliminary load, and we’ll be toggling the state of them with JavaScript developing.
* {
  box-sizing: border-box;
}

physique {
  background-color: teal;
}

.title {
  margin-bottom: 2rem;
}

.hidden {
  show: none;
}

.icon {
  width: 24px;
  peak: 24px;
  place: absolute;
  high: 32px;
  proper: 5px;
  pointer-events: none;
  z-index: 2;
}

.icon.icon-success {
  stroke: teal;
}

.icon.icon-error {
  stroke: pink;
}

.container {
  max-width: 460px;
  margin: 40px auto;
  padding: 40px;
  border: 1px strong #ddd;
  border-radius: 10px;
  background-color: white;
  box-shadow: 0 20px 25px -5px rgba(0, 0, 0, 0.1), 0 10px 10px -5px rgba(0, 0, 0, 0.04);
}

.label {
  font-weight: daring;
  show: block;
  coloration: #333;
  margin-bottom: 0.25rem;
  coloration: #2d3748;
}

.enter {
  look: none;
  show: block;
  width: 100%;
  coloration: #2d3748;
  border: 1px strong #cbd5e0;
  line-height: 1.25;
  background-color: white;
  padding: 0.65rem 0.75rem;
  border-radius: 0.25rem;
}

.enter::placeholder {
  coloration: #a0aec0;
}

.enter.input-error {
  border: 1px strong pink;
}

.enter.input-error:focus {
  border: 1px strong pink;
}

.enter:focus {
  define: none;
  border: 1px strong #a0aec0;
  box-shadow: 0 1px 3px 0 rgba(0, 0, 0, 0.1), 0 1px 2px 0 rgba(0, 0, 0, 0.06);
  background-clip: padding-box;
}

.input-group {
  margin-bottom: 2rem;
  place: relative;
}

.error-message {
  font-size: 0.85rem;
  coloration: pink;
}

.button {
  background-color: teal;
  padding: 1rem 2rem;
  border: none;
  border-radius: 0.25rem;
  coloration: white;
  font-weight: daring;
  show: block;
  width: 100%;
  text-align: middle;
  cursor: pointer;
}

.button:hover {
  filter: brightness(110%);
}
3. Plugging within the JavaScript
Now on to the characteristic presentation! Including JavaScript is what will make or break this way.
I discussed a couple of objectives earlier than, however right here is the whole record in an overview:
- Guarantee the right information is entered into every subject.
- Show useful suggestions if a subject is legitimate or invalid
- Don’t permit the shape to be submitted if any fields are invalid
- Validate the shape in real-time as a person varieties or clicks Create account.
Pondering Modularly
With the onset of ES6 and additional help of JavaScript in trendy browsers, we will leverage some newer options that permit the code we write to be extra reusable.
With that in thoughts, I’ll be utilizing JavaScript’s constructor sample and create a brand new Class that can be utilized for future types if vital.
These patterns stem from backend programming ideas, although, in JavaScript, it’s extra of extraction since JavaScript isn’t a standard programming language. I’d advocate studying extra concerning the inner-workings of lessons and constructors if you wish to perceive extra behind how they work.
I ought to point out that the ultimate code isn’t 100% modular, however the concept is to shift it that manner as a lot as attainable. As your software or web site scales, it’d make sense to entertain the thought of a JavaScript framework since frameworks are likely to extract repeated logic. These frames of thought will let you reuse code and hold issues extra organized.
Begin With a New Class
To kick issues off, we’ll create a brand new class referred to as FormValidator.
class FormValidator {}
We’ll add a constructor operate inside the category and settle for two arguments. You’ll be able to consider this operate because the one you get without spending a dime with any class in JavaScript. The concept is to have the ability to name the category in a while some other place and cross in arguments for reuse. That may not be 100% clear but, however as we progress, it ought to make extra sense.
class FormValidator {
  constructor(kind, fields) {
    this.kind = kind
    this.fields = fields
  }
}
We’ll initialize new values to cases within the FormValidator class contained in the constructor operate. These values permit us to make use of them anyplace throughout the scope of the category, because of the this key phrase. On this case, this refers back to the scoped class FormValidator, however this can all the time change based mostly on its scope.
The constructor operate initializes a kind and the fields throughout the kind. My aim is to have the FormValidator extract the logic away, so all we’ve to do is cross references to a given kind and its subject by their identifiers or names. That may make extra sense in a bit.
Goal Type Parts
Subsequent up, I’ll create some variables that question the DOM for the weather we’ll goal. These, in fact, embrace the shape and its fields.
With these in place, we will arrange a brand new occasion of our FormValidator class.
const kind = doc.querySelector(".kind")
const fields = ["username", "email", "password", "password_confirmation"]

const accountForm = new FormValidator(kind, fields)
The kind variable is answerable for querying the DOM to search out the shape aspect on the web page with a category of .kind. The fields variable is an array of names referenced by every kind subject’s id attribute. The names in your HTML should match the contents of the array values for correct concentrating on. We’ll use the array values contained in the FormValidator class to question for every subject as vital.
The accountForm variable is our reference to a brand new occasion of the FormValidator class. We cross within the kind and fields variables which initializes these inside the category to be used wherever we’d like them.
At this level, nothing will get referred to as from the category, so we have to add some extra code to kick that motion off.
class FormValidator {
  constructor(kind, fields) {
    this.kind = kind
    this.fields = fields
  }

  initialize() {
    console.log(this.kind , this.fields)
  }
}

const kind = doc.querySelector('.kind')
const fields = ["username", "email", "password", "password_confirmation"]

const accountForm = new FormValidator(kind, fields)

accountForm.initialize()
I added an initialize operate to the FormValidator class beneath the constructor operate. You’ll be able to title this operate no matter you want, however I’ll generally use initialize as a choice.
Contained in the initialize operate, I wrote a easy console.log() assertion and handed within the values we arrange throughout the constructor operate. If all goes effectively, this could log the occasion of our kind and the array of subject ids I discussed prior.
On the finish of the file, I’m calling the initialize() operate straight.
accountForm.initialize()
That ought to log one thing like the next in your browser’s console.

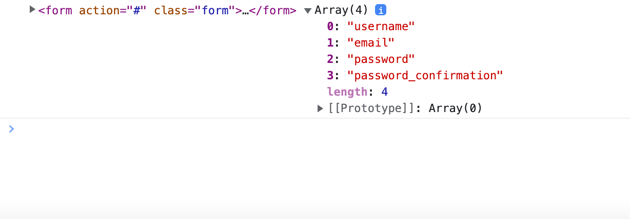

Success! We all know the code up to now is correct because of these values outputting what we anticipate.
4. Add Type Validations on Consumer Enter
Listening to a person’s enter will assist us preemptively validate every subject. We will hook into the JavaScript addEventListener() methodology to just do that. You’ll be able to pay attention to numerous occasions, and on this part, we’ll take note of the enter occasion particularly.
I’ll make a brand new operate within the class referred to as validateOnEntry().
class FormValidator {
  //... earlier code omitted for brevity

  validateOnEntry() {
    let self = this
    this.fields.forEach(subject => {
      const enter = doc.querySelector(`#${subject}`)

      enter.addEventListener('enter', () => {
        // extracted logic to a brand new operate
        self.validateFields(enter)
      })
    })
  }
}
Lots in these few strains of code is probably going complicated. Let me clarify in higher element.
Understanding Scope
First, we create a variable referred to as self and assign it to this.
Setting this variable up acts as a technique to goal the worth of this relative to the scope of the overarching class (FormValidator) from inside different nested scopes.
The rationale I included the self variable is so we will have entry to the core class FormValidator contained in the addEventListener() methodology for the reason that scope modifications when you nest any code contained in the operate. Learn extra about Scope on MDN.
Looping By
To correctly validate every subject, we’ll have to loop by every array property contained in the fields variable we arrange utilizing the constructor operate. The code outputs every subject title we wish to goal utilizing the forEach() methodology.
Throughout the loop, we use backticks to dynamically question the doc (DOM) to search out the suitable subject recognized by the id attribute.
Lastly, we use every dynamic subject, assign it to an enter variable and name the addEventListener() operate. We pay attention for an enter occasion and name a brand new operate we’ll create named validateFields. This operate accepts a single enter for validation functions.
I selected to extract the validation logic into a brand new operate referred to as validateFields() as a result of a lot of the code is reusable. Eradicating the code to a brand new operate additionally aids in legibility from a developer’s viewpoint.
5. Validating Every Area
To validate the shape fields, we’ll want some conditional statements together with some bells and whistles to make the interface react in real-time.
Earlier than we write the logic for the validateFields operate, I’ll write one other operate answerable for the design portion. We will reuse this operate later, so it is smart to extract it to a single set of logic, which I referred to as setStatus.
class FormValidator {
  // earlier code omitted for brevity

  validateOnEntry() {
    let self = this
    this.fields.forEach(subject => {
      const enter = doc.querySelector(`#${subject}`)

      enter.addEventListener('enter', () => {
        // extracted logic to a brand new operate
        self.validateFields(enter)
      })
    })
  }

  validateFields() {
    // logic to come back
  }

  setStatus(subject, message, standing) {
    const successIcon = subject.parentElement.querySelector('.icon-success');
    const errorIcon = subject.parentElement.querySelector('.icon-error');
    const errorMessage = subject.parentElement.querySelector('.error-message');

    if (standing === "success") {
      if (errorIcon) { errorIcon.classList.add('hidden') }
      if (errorMessage) { errorMessage.innerText = "" }
      successIcon.classList.take away('hidden')
      subject.classList.take away('input-error')
    }

    if (standing === "error") {
      if (successIcon) { successIcon.classList.add('hidden') }
      subject.parentElement.querySelector('.error-message').innerText = message
      errorIcon.classList.take away('hidden')
      subject.classList.add('input-error')
    }
  }
}
The setStatus operate accepts three parameters: the sector we’re concentrating on, a message if wanted, and the validation standing.
Contained in the operate, we start with three variables. successIcon, errorIcon, and errorMessage.
If you happen to recall, every kind grouping has a set of those components within the markup. Two are SVG icons, and the opposite is an empty span that takes accountability for displaying textual content content material if validation fails. The subject parameter can be how every repeated icon and span tag is focused relative to its positioning within the DOM.
Beneath the variables are two conditional statements that verify for string standing values we’ll add to the validateFields operate.
One assertion checks for "success" and the opposite for "error" state denoted by a standing parameter that will get handed by to the setStatus operate.
Inside every conditional, you’ll discover extra logic that toggles icon lessons and resets the error messages to any message handed by to the setStatus operate. The logic on this code is all taking place in real-time as a person varieties right into a subject.
Guaranteeing Fields Aren’t Empty
With the setStatus operate authored, we will now put it to make use of by performing the validations on every subject. Relying in your types, you might require distinctive validations if in case you have particular person kind fields. Perhaps you don’t need any fields to be clean, for instance.
We’ll begin with that aim and guarantee every subject isn’t clean.
class FormValidator {
  // code omitted for brevity
  validateFields(subject) {
    if (subject.worth.trim() === "") {
      this.setStatus(subject, `${subject.previousElementSibling.innerText} can't be clean`, "error")
    } else {
      this.setStatus(subject, null, "success")
    }
  }

  setStatus(subject, message, standing) {
    // code omitted for brevity
  }
}
The code above takes the subject argument and targets its worth. Utilizing the trim() methodology in JavaScript, we will take away any white areas and verify if the worth is an empty string.
If the enter is empty, we’ll use the setStatus operate and cross the sector, the question assertion to search out the .error-message span tag relative to the sector, and the standing of "error".
If the enter is not empty, we will use the identical setStatus operate throughout the FormValidator class to show a hit state. No message is critical for this state so we will cross null for the message argument.
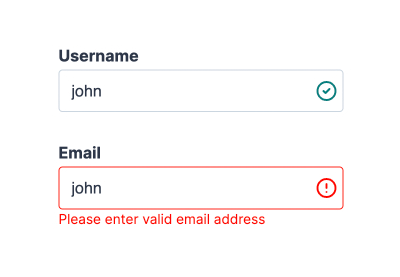
Guaranteeing an E mail Tackle is Legitimate
When creating your individual JavaScript kind validation, checking for legitimate e mail addresses is an artwork in itself! Right here’s how we’ll go about it:
class FormValidator {
  // code omitted for brevity
  validateFields(subject) {
    // Examine presence of values
    if (subject.worth.trim() === "") {
      this.setStatus(subject, `${subject.previousElementSibling.innerText} can't be clean`, "error")
    } else {
      this.setStatus(subject, null, "success")
    }

    // verify for a sound e mail tackle
    if (subject.kind === "e mail") {
      const re = /S+@S+.S+/
      if (re.take a look at(subject.worth)) {
        this.setStatus(subject, null, "success")
      } else {
        this.setStatus(subject, "Please enter legitimate e mail tackle", "error")
      }
    }
  }

  setStatus(subject, message, standing) {
    // code omitted for brevity
  }
}
Firstly, we’ll be sure the sector kind outlined with the JavaScript API is an e mail kind.
We’ll then leverage some REGEX patterns to make sure the e-mail entered matches our expectations. The take a look at() methodology lets you cross in a REGEX sample to return a boolean (true or false worth) by “testing” it towards what worth is given.
If the worth makes the reduce, we’ll once more use our setStatus features to show suggestions to the person. We will customise the message worth to no matter is smart for the validation.
Password Affirmation
Final however not least is the password affirmation validation. The aim is to make sure the password subject matches the password affirmation subject, and we’ll do that by evaluating each values.
class FormValidator {
  // code omitted for brevity
  validateFields(subject) {
    // Examine presence of values
    if (subject.worth.trim() === "") {
      //...
    }

    // verify for a sound e mail tackle
    if (subject.kind === "e mail") {
      //...
    }

    // Password affirmation edge case
    if (subject.id === "password_confirmation") {
      const passwordField = this.kind.querySelector("#password")

      if (subject.worth.trim() == "") {
        this.setStatus(subject, "Password affirmation required", "error")
      } else if (subject.worth != passwordField.worth) {
        this.setStatus(subject, "Password doesn't match", "error")
      } else {
        this.setStatus(subject, null, "success")
      }
    }
  }

  setStatus(subject, message, standing) {
    // code omitted for brevity
  }
}
We have to go one step additional to validate a number of edge instances for the password affirmation subject. The password affirmation, in fact, can’t be a clean subject, and we additionally want to make sure it matches the password enter’s subject worth.
For every case, we show the suitable standing.
6. Validation on Submit
Our JavaScript kind validation is sort of full! However we’ve but to account for the submit button, a vital piece of the shape itself. We’ll have to repeat the method we did for the enter occasion for the submit occasion utilizing one other addEventListener() operate.
That may come from one other operate I’ll name validateOnSubmit().
class FormValidator {
  // code omitted for brevity
  validateOnSubmit() {
    let self = this

    this.kind.addEventListener("submit", (occasion) => {
      occasion.preventDefault()
      self.fields.forEach((subject) => {
        const enter = doc.querySelector(`#${subject}`)
        self.validateFields(enter)
      })
    })
  }
}
Within the validateOnSubmit() operate we’ll goal the kind occasion we arrange on the constructor operate beforehand. The shape provides us entry to the occasion listener kind often called submit since these components are tied collectively in HTML.
Utilizing an addEventListener() operate, we’ll pay attention for the submit occasion and cross the occasion by to the operate’s physique.
Contained in the operate physique we will use the preventDefault() methodology to maintain the shape from submitting in its default method. We wish to do that to stop any nasty information from passing if validation will not be passing.
We’ll once more set a self variable assigned to this so we’ve entry to the upper stage of scope in our FormValidator class.
With this variable, we will loop by the fields occasion initialized throughout the FormValidator class. That will get carried out from throughout the addEventListener() operate.
Every subject we loop by is assigned to an enter variable and at last handed by the validateFields operate we created beforehand.
Lots is occurring right here, however fortunately we will reuse a number of code from earlier than to perform the identical objectives!
Clicking the Create account button ensures every subject is legitimate earlier than making it by.
7. Calling the Validations
The final piece of the JavaScript kind validation puzzle is asking each the validateOnEntry() and validateOnSubmit() features. If you happen to recall, we referred to as the initialize() operate initially of this tutorial. I’ll use it to name the 2 features.
class FormValidator {
  constructor(kind, fields) {
    this.kind = kind
    this.fields = fields
  }

  initialize() {
    this.validateOnEntry()
    this.validateOnSubmit()
  }

  //code omitted for brevity...
}
The Ultimate End result
With all our validations and features in place, right here’s the ultimate JavaScript kind validation code for reference. A lot of this code is reusable, and you’ll all the time add further subject varieties.
class FormValidator {
  constructor(kind, fields) {
    this.kind = kind
    this.fields = fields
  }

  initialize() {
    this.validateOnEntry()
    this.validateOnSubmit()
  }

  validateOnSubmit() {
    let self = this

    this.kind.addEventListener("submit", occasion => {
      occasion.preventDefault()
      self.fields.forEach((subject) => {
        const enter = doc.querySelector(`#${subject}`)
        self.validateFields(enter)
      })
    })
  }

  validateOnEntry() {
    let self = this
    this.fields.forEach((subject) => {
      const enter = doc.querySelector(`#${subject}`)

      enter.addEventListener("enter", () => {
        self.validateFields(enter)
      })
    })
  }

  validateFields(subject) {
    // Examine presence of values
    if (subject.worth.trim() === "") {
      this.setStatus(subject, `${subject.previousElementSibling.innerText} can't be clean`, "error")
    } else {
      this.setStatus(subject, null, "success")
    }

    // verify for a sound e mail tackle
    if (subject.kind === "e mail") {

      const re = /S+@S+.S+/

      if (re.take a look at(subject.worth)) {
        this.setStatus(subject, null, "success")
      } else {
        this.setStatus(subject, "Please enter legitimate e mail tackle", "error")
      }
    }

    // Password affirmation edge case
    if (subject.id === "password_confirmation") {

      const passwordField = this.kind.querySelector("#password")

      if (subject.worth.trim() == "") {
        this.setStatus(subject, "Password affirmation required", "error")
      } else if (subject.worth != passwordField.worth) {
        this.setStatus(subject, "Password doesn't match", "error")
      } else {
        this.setStatus(subject, null, "success")
      }
    }
  }

  setStatus(subject, message, standing) {
    const successIcon = subject.parentElement.querySelector(".icon-success")
    const errorIcon = subject.parentElement.querySelector(".icon-error")
    const errorMessage = subject.parentElement.querySelector(".error-message")

    if (standing === "success") {
      if (errorIcon) {
        errorIcon.classList.add("hidden")
      }

      if (errorMessage) {
        errorMessage.innerText = ""
      }

      successIcon.classList.take away("hidden")
      subject.classList.take away("input-error")
    }

    if (standing === "error") {
      if (successIcon) {
        successIcon.classList.add("hidden")
      }

      subject.parentElement.querySelector(".error-message").innerText = message
      errorIcon.classList.take away("hidden")
      subject.classList.add("input-error")
    }
  }
}

const kind = doc.querySelector(".kind")
const fields = ["username", "email", "password", "password_confirmation"]

const validator = new FormValidator(kind, fields)
validator.initialize()
A Phrase of Warning!
If a person toggles off JavaScript of their browser, you threat letting inadequate information into your web site or software. This drawback is the draw back to utilizing solely front-end kind validation.
I’d advise including a fallback resolution for kind validations utilizing one thing like backend code.
I write a number of purposes utilizing front-end and backend code utilizing an internet software framework like Ruby on Rails. The framework handles a number of these issues for me together with enhanced safety features.
Even when I add front-end validation, I’ll nearly all the time take the additional initiative so as to add backend validations to an software or web site.
Including backend validations ensures that if JavaScript occurs to be disabled in a browser or perhaps a fluke incident happens, I can nonetheless depend upon the backend code (sometimes on a server) to maintain inadequate information out.
Closing Ideas
Whereas there are lots of enhancements we will make to this pattern account creation kind, I hope the approaches taken on this tutorial have shed some mild on methods you possibly can improve your individual types with easy JavaScript validation.
Keep in mind, front-end validations are solely a part of the piece of correctly validating kind submission information.
A backend resolution or some middleman step to filter the information is a big barrier to protecting the nasty information from reaching wherever you retailer your information. Comfortable coding!
Be taught Extra Entrance Finish JavaScript
We have now a rising library of front-end JavaScript tutorials on Tuts+ that will help you together with your studying:
[ad_2]